- Published on
Blue Star Juniper Bonsai Care (Juniperus squamata)

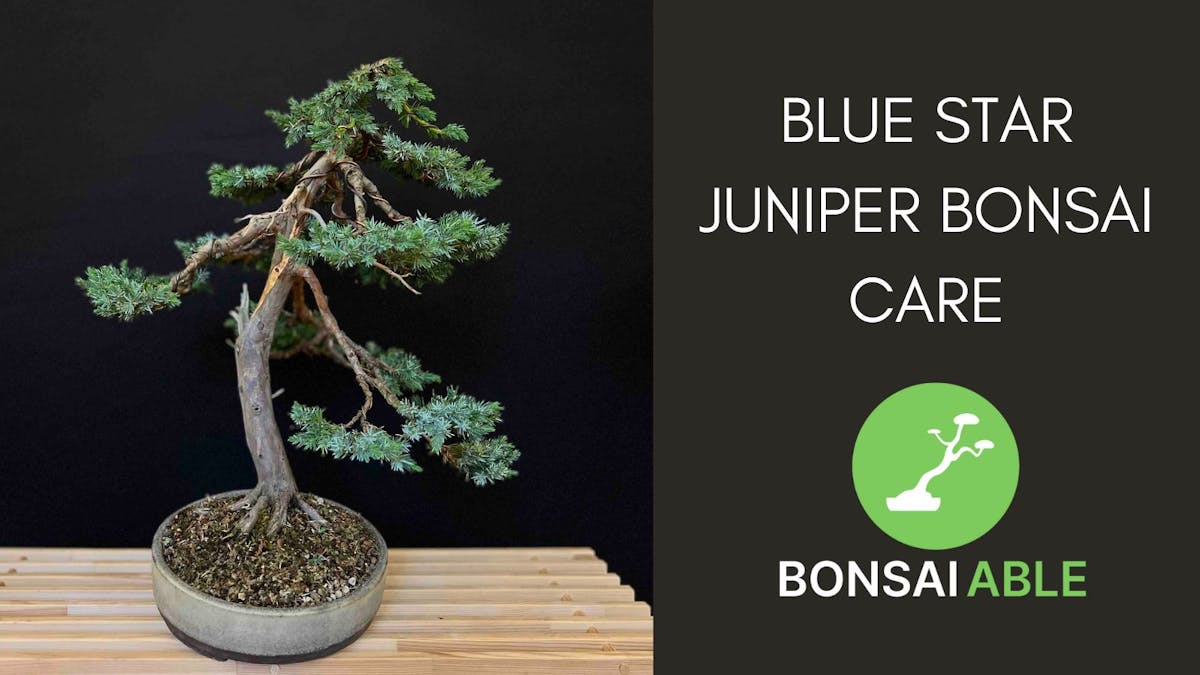
Blue Star Juniper (Juniperus squamata) is a great species to use for bonsai. They have a striking blue/green foliage that contrasts nicely with other bonsai in the garden, and are very accessible and easily styled for beginners. Similar to Procumbens juniper, they hold their foliage in the juvenile form, which makes the creation of pads far easier. In this blog, we'll tell you all you need to know about Blue Star Juniper Bonsai Care.
Juniperus squamata
Blue Star Juniper is a cultivar of Juniperus squamata, a shrub native to the Himalayas and China. Squamata juniper is a slow-growing evergreen shrub that is often used as ground cover in landscape gardening.
As mentioned above, Juniperus squamata holds its foliage in the juvenile form, which is prickly rather than the smooth scale foliage you tend to see in other domesticated Juniper cultivars used for bonsai. The feature of Juniperus squamata that helps it stand out from other Junipers is the lovely blue color of its foliage. The blue is a great addition to a bonsai garden to help break up the deep green of most bonsai species.
Being native to mountain ranges, Squamata juniper plants are very frost hardy and can tolerate freezing temperatures easily. They also enjoy growing in full sun or partial shade, which makes them easy to care for as bonsai.
Blue Star Junipers tend to have more of a lateral rather than a vertical growth habit, but they tolerate wiring very well and can be cultivated in many styles of bonsai. Overall they are one of the best juniper species used in bonsai.
Pruning
Pruning can be carried out at various points in the year, depending on your goals and the stage of growth your bonsai is at.
Structural pruning
If you are removing big branches and doing primary branch selection, then there are two good times of year to be operating. These are early spring before growth starts to elongate, and early autumn after the worst heat of summer has passed.
Early spring is great for big branch removal because the tree is packed with stored energy from last year's growing season. By removing branches before growth starts, the tree can reallocate its resource to patch wounds and grow out the remaining branches.
Once growth starts in spring you are best to leave your tree alone. During this period this is a hormonal exchange between the growing foliage tips and the roots, and pruning now can disrupt that. Once growth has hardened off and the heat of summer has passed, you're in another prime window for major styling of a Blue Star Juniper bonsai.
It's worth noting that the later you work in autumn, the less time the tree will have to compartmentalize wounds and reallocate resources before winter dormancy hits.
Refinement pruning
If you have already set the bones of your Squamata juniper bonsai then you'll want to start maintenance or refinement pruning. This kind of pruning has three goals:
- Maintain the shape and silhouette of the tree
- Encourage growth of interior buds
- Balance energy across the bonsai, holding back strong areas and encouraging weak ones
Refinement pruning should start sometime between late May and the end of June, once growth has elongated to around half an inch. As mentioned above, hormonal cross-talk between foliage and roots means it's a bad idea to prune during spring while growth is starting out.
Start by removing any downward growing foliage, or shoots coming from the underside of branches. This helps to maintain a clean bottom to our pads which gives them a clear definition.
After removing the bottom shoots, look at the profile of your bonsai and identify the tips that have grown past the desired shape. These should be cut back to the next shoot or bud that is within the limits of the bonsai's canopy.
Cutting these strong tips back removes a hormone named auxin, which acts by suppressing the growth of interior shoots. Removing auxin triggers interior branches to grow, which helps to distribute the tree's energy across more growing tips.
Depending on your climate and fertilization practices, you may need to come back and prune again once or twice in the same growing season.
By repeating this process over years you can maintain a well-balanced bonsai. Over time branches will slowly elongate, but since we are encouraging the growth of interior buds you will have branches further back to prune back to if you want to redefine the limits of your canopy.
Should I pinch a Blue Star Juniper Bonsai?
You should never pinch a Blue Star Juniper Bonsai, or any Juniper for that matter.
As discussed above, pruning single elongating tips removes auxin, which encourages interior buds to grow. If you prune a Blue Star Juniper, you will likely remove the tips of the interior buds as well as the strong growing tips.
The loss of auxin in the tips you want to take over as new leaders can be very detrimental. These tips will be much less likely to grow, and in the worst case, the branch could die back as a result.
Wiring
Juniperus squamata is a very supple species that can be bent and contorted into many interesting shapes with the use of wire.
Blue Star Juniper is most commonly used to create shohin-sized trees using nursery stock. Copper wire is generally preferred over aluminum, as it allows the practitioner to use a smaller gauge of wire which helps in shohin bonsai creation. Aluminum wire can also be used, but it has less holding capacity so will require 'doubling up' or using a heavier gauge, which could spoil the aesthetic if you're creating a smaller tree.
Simple wiring can be done any time through the growing season and is most commonly done at the same time as pruning. If you are wiring structural branches and creating big bends, then you mustn't do this over the summer period.
Between late spring and the end of summer, Junipers are growing their foliage and moving lots of moisture from the roots to the leaves. The extra water in the system makes the cambial layer (the cell-dividing layer of bark) 'slippy' on the underlying xylem. Big bends can separate the cambium from the xylem, which will kill that branch.
After the heat of summer has passed the cambium will adhere more strongly to the xylem again, making early autumn a good time for big bending and setting the structure of the tree. After you've applied wire, you should leave it on long enough for the wire to start biting in so the bends hold their position once the wire has been removed.
Design
Blue Star Juniper can be used to create many designs for bonsai. As mentioned above, it is most commonly used in the creation of shohin bonsai as young plants are easily accessible from garden nurseries.
As a low-spreading shrub, Squamata juniper is often used to create cascade bonsai. It can also be used to create informal upright or windswept styles, and multiple plants can be used together to create groupings or forests. This is particularly effective when planted on a natural surface such as a stone.
Repotting
As a Juniper, Blue Star derives its strength from its foliage mass. It can therefore tolerate repotting and root reduction very well, so long as it has good foliage mass to drive the regeneration of roots.
Like all bonsai, you should not repot your Junipers on a schedule. The decision to repot should be based on the appearance of the root system, or if you want to change the aesthetic of the tree. Reasons to repot a Blue Star Juniper bonsai include:
- Water is not percolating through the rootball when water, but it just runs off the sides instead
- Soil has started to breakdown and decompose, leaving the rootball too wet and exposing the bonsai to the risk of root rot
It can take anywhere between 3-8 years for the above to happen, based on the vigor of the tree, your fertilization practices, and your watering application.
Like most bonsai trees, Blue Star Junipers should be repotted in late winter or early spring, ideally just before they start to grow.
When repotting a Juniperus squamata, you can follow these basic steps:
- Use a root sickle to free the roots from the edge of the pot and cut any wires holding the tree in the pot. Carefully remove the bonsai from the pot, making sure that the tree and root ball move together - you don't want to tear the tree from its roots.
- Scrape away soil and moss from the top of the rootball with a chopstick to expose the nebari. There are often interesting roots to be found that have been covered by moss and fertilizer over the years. Keep working down through the root ball until you find intact soil particles. Removing the top layer of compacted soil is an important step to allow water to flow through the entire root ball.
- Using a paint scraper or a chopstick, remove the matted roots from the bottom of the root ball. This can be cut away like cake in an established root ball. Identify any areas of decomposed soil that could hold excess water and impact the health of your bonsai. Decomposed soil will look very dark, sometimes black, and can have a sour smell.
- Cut away the matted roots from the sides of the root ball. This needs to be the last thing you do to the root ball, as it may cause some instability in the root mass which makes it much more difficult to work with.
- Prepare your pot by adding drainage screens. Work out where your tie-down wires will need to emerge and pass them through the wire holes into place. For a larger tree aim to tie the tree down in 3 positions. Smaller trees may only require 2 tie-down wires.
- Sprinkle a layer of soil into the base of the pot, then add a pile in the center. Settle your bonsai onto the soil mound and rotate the tree back and forth as you settle it into the pot. This helps to fill any gaps in the root ball where old soil had been removed.
- Lightly tighten your tie-down wires. Fill the pot with soil, then fully tighten your tie-downs.
- Using your chopstick once again, introduce the new soil into any holes in the root ball. Lightly stab back and forth into the soil and you will see the soil height dropping as it works its way into the gaps.
- Create a topdressing by grinding up dried green moss and dried sphagnum moss, mixed in a 1 : 1 ratio. Apply a light layer over the top of the soil mass, then gently spray with water to make the moss stick.
- Water your tree very thoroughly until water starts draining clear from the bottom. It is common to have crushed soil particles in the pot so it's important to wash them out to prevent them from holding too much water.
Repotting aftercare for Blue Star Juniper bonsai
Repotting a bonsai tree is a stressful and traumatic process for the plant, and it should be treated with respect. After a repot, your bonsai will need to be kept somewhere sheltered from the wind, rain, and excessive sun.
The tree should be allowed to dry out properly after the first watering, to allow oxygen into the pot to trigger the growth of new roots. The first half-inch of soil should be allowed to dry out completely.
Fertilizer should not be applied to the bonsai until it has shown signs of elongating growth, most likely occurring at the end of spring or the beginning of summer. Fertilizer contains high levels of salts, which can sometimes kill new root tips that may be particularly sensitive.
Fertilization
Fertilization is an important part of good bonsai tree care. While it is not essential for a bonsai tree to survive, fertilizer provides many important micronutrients and works as a growth stimulant to help achieve our goals for the tree.
How much you should fertilize depends on what stage of development the tree is at.
For plants in early development, you will want to fertilize heavily. This helps us to get strong root growth to establish the tree in a bonsai container and can help to thicken the trunk or branches if this is your goal.
As the tree moves into secondary development and refinement, you will want to start pulling back on the quantity of fertilizer you use. Using a small amount of fertilizer will still provide the tree with micronutrients and help to foster a healthy ecosystem in the pot, but it will not trigger strong elongating growth that will ruin the balance of a well-refined bonsai.
Organic fertilizers should be favored over synthetic ones, as they provide a more rounded blend of nutrients for the tree, as well as encourage the growth of micro-organisms that can increase root health.
Pests and diseases
Junipers can experience many common pest and disease problems, such as:
- Spider mites
- Scale insects
- Juniper tip blight
- Root rot
Position in the garden
Junipers enjoy full sun when cultivated as bonsai. They can still be grown in positions with partial shade but will do best with as much sun as they can get.